Monday, May 14, 2012
This Old House - Part II
As often happens with home buying, home projects, and DIY, things have taken a lot longer to come together than originally anticipated. What seemed to be a simple task, scraping off some old paint, replacing rotted wood trip, and primering the house, ended up taking over a month and turning my life upside down. But now that that's done, I hope good things will follow. More to come.
Wednesday, April 18, 2012
This Old House
So I've been neglecting my blog, but I have a good reason! I'm in the process of buying the home I've been living in and have had to do some major work under a tight schedule in order to secure my loan.
Of course at first it didn't seem like such major work, scrape the paint, replace any wood with dry rot, repaint - easy right? I discovered pretty quickly that my wood siding was covered with a stucco-like substance that took tons and tons of work to remove.
Below is a picture of the front of the house after the peeling paint had been scraped off, the remaining white paint is the crazy-resistant stucco-like stuff.

The other front of the house. Luckily, only these two faces of the house are covered in wood siding, the rest is stucco, which is in decent shape and just needs to be painted.
 We've got a lot more done since these photos were taken, I will post more pictures soon! Once we finish this project (which has monopolized nearly every minute of our lives for the past three weeks) I will have some free time for crafting and blogging...before we begin the next project that is...
Tuesday, February 21, 2012
Dollish Polish
So there are all sorts of indie-nail polish brands out there for sale on Etsy and often for sale on their own blogs. Dollish Polish is one of these indie-brands that I first saw featured on the nail blog that started my nail obsession, The PolishAholic.
I picked up a couple mini-bottles of Dollish polish on Etsy to try and the first one I've tried is pictured below. Cold Winds are Rising is a pale gray with turquoise blue microglitter and sparse royal blue hex glitter.
 I used three coats of the polish to get full coverage, it's pretty sheer and I probably should have applied a light gray as a base and used this as a topcoat, I'll have to try that for the next color I got, Toxic Avenger.

For this last photo I applied a matte topcoat to mattify the polish. I think I prefer it matte.

I picked up a couple mini-bottles of Dollish polish on Etsy to try and the first one I've tried is pictured below. Cold Winds are Rising is a pale gray with turquoise blue microglitter and sparse royal blue hex glitter.
I used three coats of the polish to get full coverage, it's pretty sheer and I probably should have applied a light gray as a base and used this as a topcoat, I'll have to try that for the next color I got, Toxic Avenger.
For this last photo I applied a matte topcoat to mattify the polish. I think I prefer it matte.

Monday, February 13, 2012
Valentine's Nails
Happy Valentine's Day!
All I wanted this Valentine's Day was chocolate. I wanted to keep it simple, make it easy for the BF. I told him weeks in advance, and I reminded him exactly where Godiva was located in case he forgot. All my efforts were rewarded when I came home to find this lovely heart-shaped box of chocolate pictured below. (We celebrated a night early since the BF is travelling for work today.)
 I thought I'd do a special Valentine's mani with a white base and a topcoat of pink foil hearts and silver microglitter. I think it's ok, not one of my favorites, white polish is always tough to pull off, you've got to do a perfect job or every little imperfection shows up.
 I was inspired to do this mani when I came across this bottle of Nicole Have a Heart by OPI polish at my local Wal-Mart pictured below. I thought is was just the prettiest thing and looked like candy. Unfortunately, this polish just doesn't contain enough glitter or hearts. It was a lot of work to fish out each little heart and place it on my nails. In fact, one of my coworkers was asking me to borrow a topcoat for her mani, I gave her this to use, and she painted all ten nails and didn't get a single heart on the brush.
 I used two coats of this Sinful Colors Snow Me White as a base. As I said, I'm not crazy about white polish, but this one was ok.
 This mani was fun, but I'm way more excited about the chocolates. I hope you have a wonderful Valentine's Day with your someone special, and if you're on your own this Valentine's, treat yourself to something that makes you happy.
Clothes Swap
Every year or so my girlfriends and I have a clothes swap. The most recent swap was this past Sunday at my place.
The general idea is that you bring all of your clothes, shoes, accessories that don't fit or you just don't wear, and that are taking up space in your closet, and you bring them to swap. I've heard of some swaps doing a very organized item-for-item swap, but what we do is more of a free-for-all. We bring out all our stuff, separate it into sections for tops, pants, dresses, etc., and then once everyone is there and has their stuff all layed out, we begin grabbing stuff up to try on.
There are a lot of really great things about clothes swap, it's super-girly and silly and fun for one, but it also forces you to go through your stuff, try things on, and scrutinize your wardrobe. I was able to give my friends some beautiful dresses and tops that I just wasn't wearing anymore, and I also rediscovered many things in my own closet that I simply forgot I had.
Some tips for a successful clothes swap:
 The photo above shows our "accessories" section as well as a whole bunch of t-shirts.
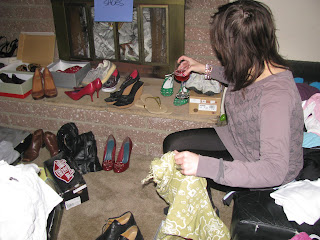 Christie is taking a break from her mimosa to check out the shoe selection.
The general idea is that you bring all of your clothes, shoes, accessories that don't fit or you just don't wear, and that are taking up space in your closet, and you bring them to swap. I've heard of some swaps doing a very organized item-for-item swap, but what we do is more of a free-for-all. We bring out all our stuff, separate it into sections for tops, pants, dresses, etc., and then once everyone is there and has their stuff all layed out, we begin grabbing stuff up to try on.
There are a lot of really great things about clothes swap, it's super-girly and silly and fun for one, but it also forces you to go through your stuff, try things on, and scrutinize your wardrobe. I was able to give my friends some beautiful dresses and tops that I just wasn't wearing anymore, and I also rediscovered many things in my own closet that I simply forgot I had.
Some tips for a successful clothes swap:
- send an email a few weeks before the swap so that people have time to go through their closets, attics, storage, etc., and then send a reminder email closer to the date,
- describe in detail a couple of the nicer things you'll be offering to get people interested, i.e. "designer shoes, size 8," or "dresses from Anthropologie,"
- let people know that regardless of their size, there will be things on hand like handbags and accessories that will fit anyone,
- I had a ton of stuff I was trying to unload, so I was sure to stress to my friends that if they couldn't find anything to bring to swap they should still come because we would have more than enough there for them to take some,
- at the swap offer libations and snacks to get everyone in a social and happy mood,
- give everyone 15 minutes or so from the start time of the swap to lay their offerings out and quickly peruse what else is there,
- set up a couple of mirrors and have a couple of dressing rooms ready, encourage your friends to try things on and show them off to the group, it makes for a fun, fashion-show type atmosphere,
- have empty shopping bags on hand for people to carry around their loot, and
- donate the leftovers to a nearby charity or shelter.
 The photo above shows our "accessories" section as well as a whole bunch of t-shirts.
 Christie is taking a break from her mimosa to check out the shoe selection.
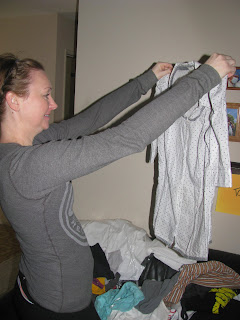
Lora checking out a shirt at the swap.
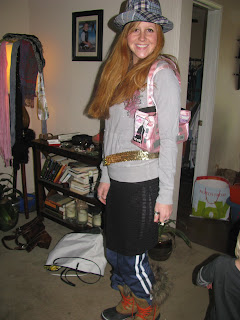 Brittany posing with as many items from the swap as she could fit on her person. Adorable.
 Brittany posing with as many items from the swap as she could fit on her person. Adorable.
Verdict: The swap was a major success. We had a great turnout, around 10 girls, and a lot of amazing stuff was swapped. Although my goal for the swap was to get rid of some stuff and get my wardrobe under control, I picked up a few lovely things myself.
Thursday, February 9, 2012
First Blog
My name is Tina and I love to try new things. Join me as I experiment with hairstyles, manicures, arts and crafts, home decor, recipes and more. I'm just learning how to blog, and how to best express myself and my experiences through descriptions and photos, but I hope that ultimately my blog will be fun and useful.
Here's a picture of some cats driving a car, if you think this is cute or funny then we'll probably get along just fine.

Here's a picture of some cats driving a car, if you think this is cute or funny then we'll probably get along just fine.

Diagonal Slate and Gold Mani

I'm starting off the blog with a Diagonal Slate and Gold Mani that I did. I had seen some lovely diagonal tape manis on Nailside that I've really been wanting to try. See a picture of the mani from Nailside below:

I prefer neutral nail colors like gray, taupe, brown, and nude shades, but it's fun to jazz them up with a little sparkle.
I apologize for the quality of the photos, photographing for blogs is something I'm trying for the first time and I think it will take some trial and error before it looks as professional as the other blogs.

This mani was done using Sally Hansen Insta Dry in Slick Slate and Sally Hansen Xtreme Wear in Golden-I. I used CND Stickey as a base coat then applies two coats of the Slick Slate. Ater it was dry I applied tape diagonally to the bottom half of my nail leaving the upper half exposed, then painted one coat of the Golden-I, removing the tape carefully immediately after painting each coat, while the polish was still wet. I finished with OPI's top coat.
Verdict: Mission Successful. Cute, fun, easy mani and I think my nails look a little blinged-out. Love it.
Subscribe to:
Comments (Atom)